Azure DNS: What Comes First?

Oh, it’s that age old question – what comes first? The chicken or the egg?  With Windows Azure, the question often is about DNS. What comes first?  The IP address of the DNS server or the machine itself?

Honestly, it depends on what you plan on doing with your virtual machines and how you utilize the virtual networks.

Option 1: Spin up a VM as a “Quick Create”
When you do this, you are creating a VM without a custom virtual network that you control. The Azure fabric will assign an external IP address (VIP) and an internal IP address (DIP) isolated from all other machines. An appropriate DNS server from the fabric will be injected and your servername.cloudapp.net DNS name will be registered so your VM can be reachable from the Internet. All is done.

You could create other VMs the same way and the only way they would be reachable from one to the other is over the Internet via ports you opened. They would not share any “internal” networking.

Option 2: Create a Virtual Network and the create VMs attached to your VNET.
When you do this, you are controlling the internal address assignments and purposely joining VMs to that network so they can communicate with each other.  For that they need an “internal” DNS server.
Because the DNS settings are injected into the VM upon boot, you must have the IP address of that DNS server in mind before you begin and assign it within your Virtual Network settings, before creating the VMs themselves.

This DNS server could be from your on-premises network (if you are creating a site-to-site VPN) or one that does not yet exist in your Azure VNET, like an server acting as an Active Directory DC, perhaps.
When you create a virtual network, take note of the first IP address that would be assigned to a machine, or you can now choose to statically assign IP addresses using PowerShell. Add that address as the DNS server in your virtual network.  Then when you create VMs they will know to use the internal DNS you specify as the primary DNS.

An external address (VIP) would still be automatically assigned and the name of the cloud service would be either your server name or something else that fits into the design of what you are trying to accomplish. That DNS name would still be registered with Azure DNS, but your internal IP address would be registered with the DNS server you specified.

Happy networking!

********************
For more “Pieces of Azure” find them here:

IT Camp Question: Can I run VMM even though I’m not in control of the entire domain?

This question was asked recently at an IT Camp on Virtualization. The attendee was responsible for the server and infrastructure of an OU, not the entire domain.  He wanted to know if he could still take advantage of Virtual Machine Manager for just the servers in that one OU.

Short Answer: Yes!

Long Answer:
Its true that VMM requires access to Active Directory for authentication and some other features, but you can run multiple instances of VMM in one domain.

A couple key points:

  • Any one host (and it’s virtual machines)can only be managed by a single instance of VMM.
  • VMM would not recognize an OU as boundary of any kind – any host could be added if the appropriate credentials were presented.
  • Each instance of VMM would have it’s own database. If reporting across multiple VMM instances becomes a requirement, it’s possible to connect each VMM instance to a single OpsMgr instance and do the monitoring and reporting from there.

So there you have it. Even if you don’t have your thumb on the pulse of your ENTIRE organization, you can still use VMM for the part you reign.

Get Ready for //build

On April 2nd, developers from around the world will gather right here in San Francisco for Microsoft’s annual //build conference talk about what’s next for Windows, Windows Server, Windows Azure, Visual Studio, and more. While the physical event is sold out, here’s how to get involved virtually:

Get ready:
Starting March 26th, you can gear up for conference with this new, free and informative Jump Start series, “Building Blocks.” Dust off your skills and join these deep dives covering HTML5, XAML, CSS, C#, mobile services, working with data, and much more. The live events with real-time Q&A sessions feature expert presenters who share their practical experience and insights.

Be there from here:
On April 2nd – 3rd, you can watch the //build keynotes and select sessions live online from the comfort of your favorite chair.  Keynotes will begin at 8:30 am (PST) and end at approximately 11:30 am (PST).  You can download the Channel 9 Events App, to browse all content and create your own schedule.
Join the social chatter around news and announcements by following @BLDWIN and checking out the official Microsoft blog

Catch up:
If you miss the event, every //build session will be posted for on-demand consumption on Channel 9 within 24 hours.

Top Support Issue Blog now available via Windows App

In January, I wrote about the Microsoft Top Support Issues blog, a blog you could visit where the top support issues for a host of Microsoft products would be listed with the best resources for solutions.  The blog is updated quarterly, but if you want quick and easy way to get to the content at any time, be sure to check out their new Windows App

Now you can just pick your product of choice from the App and it will take you right to the post with those support topics.

Cloud Security: Help Shape the Future!

Are you a Systems Administrator or Security Analyst?  Would you like to influence the future of products to manage and secure your virtualized infrastructure? Here is your opportunity to be heard by Microsoft Cloud and Data Center Management Research and Program Managers! They would like to talk to IT Pros that manage and secure your organizations virtualized and cloud environments.
If you are interested in talking further with Microsoft, please complete a short survey that will help us to determine how your job fits within the management and security of cloud and datacenter virtual computing.
The team is looking to run a series of interviews over the next few months. Join the discussion, we want to hear from you!

Beloved Desktop, Where Art Thou?

Windows XP is coming to the end of its life in short order, tablets and small form factor machines are becoming exceedingly popular, yet many are still wary about adopting Windows 8.1 on their primary computer or laptop, particularly in enterprises and offices.

Ask anyone who uses a computer for every day work tasks, they might say that they LIVE on the desktop and can’t be bothered with the new modern start menu and interface of Windows 8.1. I’ll tell you that I also live on my desktop. I use a Surface Pro as my primary machine and have been since I started at Microsoft 8 months ago.  Before that, I was using Windows 8 on an HP Envy X2.

I use Outlook, Word, OneNote and Excel, Lync, LiveWriter and IE 11 for a crazy number of line of business applications for work.  For native apps, I tend to find myself in the PDF Reader or the native mail app to checking personal email. Most of the social media I consume I use apps for Twitter, Facebook and Yammer. I think the default full screens used by native apps are great for viewing and interacting with my friends, watching video and reading news.

Slide from Windows 8.1 Quick Guide for Business.  For the complete guide visit http://www.microsoft.com/en-us/download/details.aspx?id=40895

I go back and forth between using the touch screen and the mouse regularly. Sometimes it’s easier to just reach out and touch the screen when my hands are already on the keyboard. Doing your “regular” stuff with Windows 8.1 is completely doable. But there are some things you can do to make the experience a little more seamless.

The Start Button (aka Windows Logo Key) – The Start menu is easy to get to via mouse, keyboard or touch. I find myself using the keyboard one the most, but it’s on the bezel of my Surface and on the bottom left of my screen for access with the mouse or finger. Right click on the on-screen version to access several useful tools like the Command Prompt, Control Panel and File Explorer.

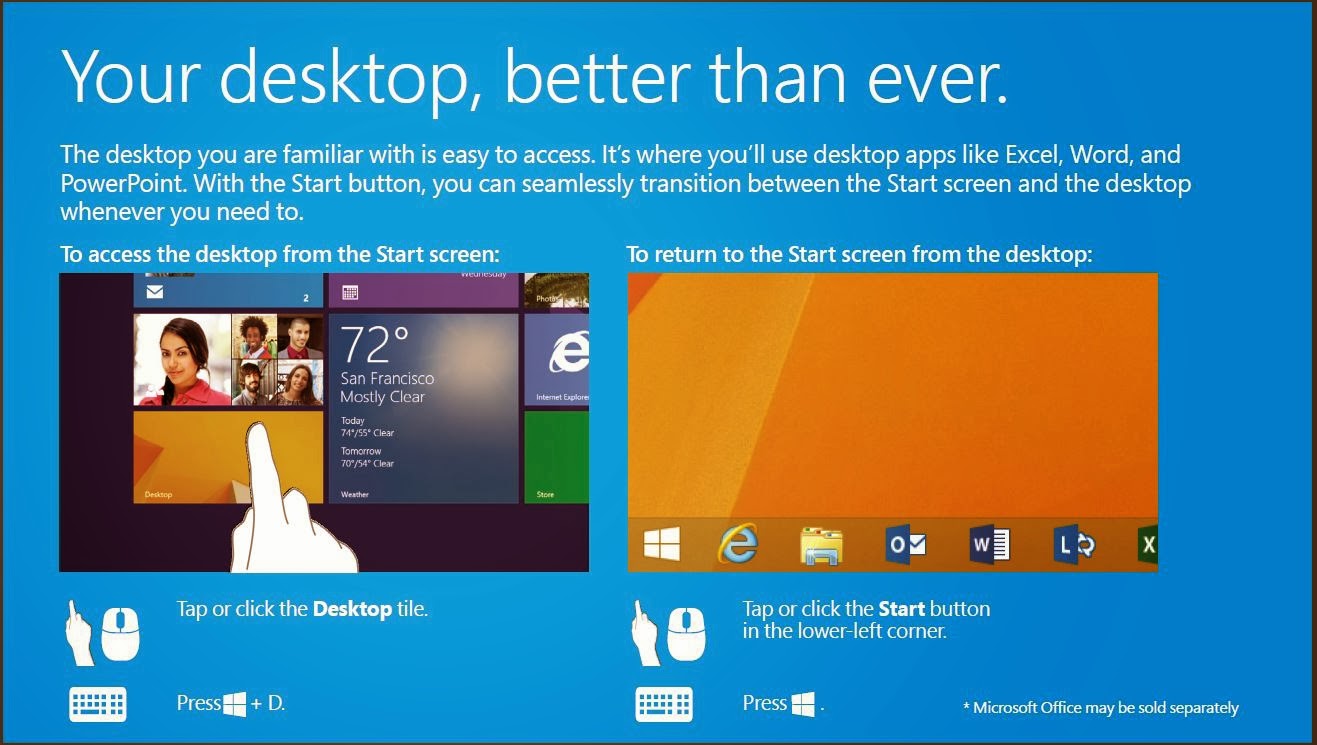
Task Bar – You can pin regularly used desktop apps right to the taskbar just like you’ve always been able to do in XP and Windows 7. With your favorites there, you could easily go all day without ever having to switch to the Start screen to launch an application.

The Taskbar properties bring a few other key changes you can make.

TaskBarProperties

Show my desktop background on Start – This setting makes the background behind your Start screen tiles the same as the background you are using on the desktop.  The result makes the switch from your desktop to the tiles less visually jarring.

When I sign in or close all apps on screen, go to the desktop instead of Start – This setting brings you to the desktop directly when you start out each day.  Going to the Start menu becomes something that only happens when you need to.

Show the Apps View when I press the Windows Logo Key – This brings you to the full list of apps and applications installed on the device instead of the tile view. Normally you’d have to swipe the tiles up to show the full apps list below it. You can also type the name of the application you are looking for when you are on the Start screen, you don’t have to click on the Search box to begin. Typing will automatically bring you into the Search tool.

So if you have been shying away from Windows 8.1 because you love your mouse and love your desktop, don’t grumble just yet. Make some of these changes and just see if you don’t start to love what Windows 8.1 can bring. 

One device for everything in your life? Well, Windows 8.1 is working for me.

This post is part of our March series of articles entitled “Windows 8.1 for Business”you’re your Microsoft Technology Evangelists.  For the full list of articles in this series please visit the series landing page: http://aka.ms/Win814Biz

TechEd 2014 Content Catalog is Live!

TechEd North America is fast approaching (May 12-15th) and if you know me, you know I’ve been a fan of this conference for many, many years.  One of the best ways to make sure the event is enjoyable for everyone is by indicating the sessions you are interested in using the Course Catalog and building your schedule.  This gives the conference organizers an idea of the popularly of topics and speakers so the room are assigned to support the number of attendees or they can schedule repeats.  No one likes being turned away at the door or standing in the back for 75 minutes.

I took a quick look at the catalog today and here is my short list of sessions I’d want to attend. These are either topics I think are interesting and more importantly, speakers who I’ve seen before or know personally and I know they know their stuff. (I was going to include the course descriptions, but it was going to make this post WAY too long… click to be take to the catalog for more information.)


I’ve Got Nothing: The DR Checklist

So what do you have to lose?  If you’ve been reading along with the blog series, I hope you’ve been thinking a bit about ways you can bring your disaster recovery plans to the next level. My first post in the series on what to consider might have gotten you started on some of the items in this list. If you need some ideas of where to go next, or if you happen to be just starting out, here is a even longer list of things you might need.

Disclaimer: I love technology, I think that cloud computing and virtualization are paramount to increasing the speed you can get your data and services back online. But when disaster strikes, you can bet I’m reaching for something on paper to lead the way.  You do not want your recovery plans to hinge on finding the power cable for that dusty laptop that is acting as the offline repository for your documentation. It’s old school, but it works. If you have a better suggestion than multiple copies of printed documentation, please let me know. Until then, finding a ring binder is my Item #0 on the list.  (Okay, Hyper-V Recovery Manager is a pretty cool replacement for paper if you have two locations, but I’d probably still have something printed to check off…)

The Checklist

  1. Backups – I always start at the backups. When your data center is reduced to a pile of rubble the only thing you may have to start with is your backups, everything else supports turning those backups into usable services again. Document out your backup schedule, what servers and data are backed up to what tapes or sets, how often those backups are tested and rotated. Take note if you are backing up whole servers as VMs, or just the data, or both. (If you haven’t yet, read Brian’s post on the value of virtual machines when it comes to disaster recovery.)
  2. Facilities – Where are you and your backups going to come together to work this recovery magic? Your CEO’s garage? A secondary location that’s been predetermined? The Cloud?  List out anything you know about facilities. If you have a hot site or cold site, include the address, phone numbers and access information. (Look at Keith’s blog about using Azure for a recovery location.)
  3. People – Your DR plan should include a list of people who are part of the recovery process. First and foremost, note who has the right to declare a disaster in the first place. You need to know who can and can’t kick off a process that will start with having an entire set of backups delivered to an alternate location.  Also include the contact information for the people you need to successfully complete a recovery – key IT, facilities and department heads might be needed.  Don’t forget to include their backup person.
  4. Support Services – Do you need to order equipment?  Will you need support from a vendor? Include names and numbers of all these services and if possible, include alternatives outside of your immediate area. Your local vendor might not be available if the disaster is widespread like an earthquake or weather incident.
  5. Employee Notification System – How do you plan on sharing information with employees about the status of the company and what services will be available to use?  Your company might already have something in place – maybe a phone hotline or externally hosted emergency website. Make sure you are aware of it and know how you can get updates made to the information.
  6. Diagrams, Configurations and Summaries – Include copies of any diagrams you have for networking and other interconnected systems. You’ll be glad you have them for reference even if you don’t build your recovery network the same way.
  7. Hardware – Do you have appropriate hardware to recover to? Do you have the networking gear, cables and power to connect everything together and keep it running? You should list out the specifications of the hardware you are using now and what the minimum acceptable replacements would be. Include contact information for where to order hardware from and details about how to pay for equipment. Depending on the type of disaster you are recovering from, your hardware vendor might not be keen on accepting a purchase order or billing you later. If you are looking at Azure as a recovery location, make sure to note what size of compute power would match up.
  8. Step-By-Step Guides – If you’ve started testing your system restores, you should have some guides formed.  If your plans include building servers from the ground up, your guides should include references to the software versions and licensing keys required. When you are running your practice restores, anything that makes you step away from the guide should be noted. In my last disaster recovery book, I broke out the binder in sections, in order of recovery with the step-by-steps and supporting information in each area. (Extra credit if you have PowerShell ready to automate parts of this.)
  9. Software – If a step in your process includes loading software, it needs to be available on physical media. You do not want to have to rely on having a working, high-speed Internet connect to download gigs of software.
  10. Clients – Finally, don’t forget your end users. Your plan should include details about how they will be connecting, what equipment they would be expected to use if the office is not available and how you will initially communicate with them.  Part of your testing should include having a pilot group of users attempt to access your test DR setup so you can improve the instructions they will be provided. Chances are, you’ll be too busy to make individual house calls. (For more, check out Matt’s post on using VDI as a way to protect client data.)

Once you have a first pass gathering of all your disaster recovery items and information, put it all in a container that you can send out to your off-site storage vendor or alternate location. Then when you practice, start with just the box – if you can’t kick off a recovery test with only the contents (no Internet connection and no touching your production systems) improve them and try again.  Granted, if you are using the cloud as part of your plan, make sure you know which parts require Internet access, have a procedure for alternative connectivity and know what parts of your plans would stall while securing that connection.  You won’t be able to plan for every contingency, but knowing where parts of the plan can break down makes it easier to justify where to spend money for improvement, or not.

No matter the result of your testing, it will be better than the last time. Go forth and be prepared.

Oh, one more thing, if you live in a geographic area where weather or other “earthly” disasters are probable, please take some time to do some DR planning for your home as well.  I don’t care who you work for, if your home and family aren’t secure after a disaster you certainly won’t be effective at work. Visit www.ready.gov or www.redcross.org/prepare/disaster-safety-library for more information.

This is post part of a 15 part series on Disaster Recovery and Business Continuity planning by the US based Microsoft IT Evangelists. For the full list of articles in this series see the intro post located here: http://mythoughtsonit.com/2014/02/intro-to-series-disaster-recovery-planning-for-i-t-pros/

Help Shape Microsoft’s Cloud Technologies: Join the IT Pro User Panel

IT Professionals: Have you ever been deep in the guts of a gnarly infrastructure deployment, automation, configuration, trouble-shooting or similar task, and thought to yourself something like this: “Why didn’t that darn product team at Microsoft make this tool work better, more like what I need it to do?” If you see yourself in this story, we have an opportunity for you!
The Windows Server System Center design and development team is looking for IT Pros with knowledge & experience in all aspects of infrastructure and services management. We need to know how to make Microsoft technologies supporting these scenarios work better for you.
IT Pros like you with these specialized knowledge and skills are hard to find, so we’ll make it worth your while. Here’s what you get from participating in the Panel:
·       Opportunities to influence WSSC design and development in areas such as
o   Prioritizing tool capabilities (what do you need MOST in these tools and technologie?)
o   User interaction (how would you expect this to work?)
o   User interface design (does this wording or picture, etc. make sense to you? Can you suggest something better?)
·       A thank you gift! After participating in a study, you’ll have the option of selecting from a list of Microsoft software, hardware, games, and more. Since IT Pros are the hardest folks to find, you get the best gifts!
If you’d like to be considered for the IT Pro User Panel, please complete this brief survey.
If you want to know more about Microsoft User Research overall, see the Microsoft User Research page.

Note: Microsoft full or part-time employees, vendors, or contingent employees are not eligible.